Monday, May 30, 2011

Judge's Pic of the Week

My boyfriend thinks him and his iPhone are unstoppable. Sometimes when helping me with my blog, he'll get these really creative ideas. Sometimes they turn out awesome...and sometimes...well sometimes they're a little too artistic. Like Picasso's what am I looking at artistic.

Never to be the one to stifle creativity. I decided to feature some of my dear beloved's artwork. I hope you find them as amusing as I do.

Wednesday, May 11, 2011

Thinking outside the box

Things haven't been fun around here. Yes, finals are finally over, but ever since I've been done I have been working NONSTOP. I took on this security/maintenance job in order to get free a room while I take summer classes. And boy, it hasn't been a walk in the park.

7 am mornings. Enough said, right?

Painting. That would be fun if there weren't approximately 400 rooms to paint in such a short time span.

Moving furniture. I feel like I do A LOT of that.

At least I get off at 11am. Although they try to beg me to stay longer. Sometimes I give in. I'm a sucker like that.

The worst part of all is the cafe is closed until the start of summer classes and the kitchen was temporary out of service.

How's a girl suppose to eat?! Lately it's been salads and sandwiches (and Kool-aid). My cousin would appreciate these summer meals. Since I haven't made it around to getting my favorite summer dessert, popsicles, I had to get creative when it came to something sweet.

Without an oven, I had to think outside the box. I decided on an icebox dish I seen on The Kitchn. Icebox desserts are no bake, no fuss treats that you store in the fridge. This ones strawberry and oh so delicious.

No Bake Strawberry Icebox Cake (via The Kitchn)

2 lbs fresh strawberries
3 1/4 cups whipping cream, divided
1/3 cup confectioners sugar
1 tsp vanilla
4 sleeves of graham crackers
2 oz finely chopped dark chocolate or chocolate chips


Gather all of your ingredients, as I sort of did here. 2 lbs fresh strawberries; 3 1/4 whipping cream, divided; 1/3 cup confectioners sugar, 1 tsp vanilla; 4 sleeves of graham crackers (I only used 3); 2 oz finely chopped dark chocolate; and 1/2 tsp rosewater (optional)

Wash all the strawberries. The recipe originally called for setting a couple aside for garnish. I attempted to do that, but since I broke my dish into smaller containers to give away instead of just one pan, I eventually skipped that step. 

A moment of honesty: This is my first time whipping cream! I'll admit that I was shocked to see this liquid go from this...
...to this by simply whipping it!


Anywho, whip 3 cups of cream with a hand mixer until it holds stiff peaks. 

Whip to combine vanilla and sugar. Now the hard part is done!

Slice strawberries until your heart is content. 

Keep going. The more, the merrier.

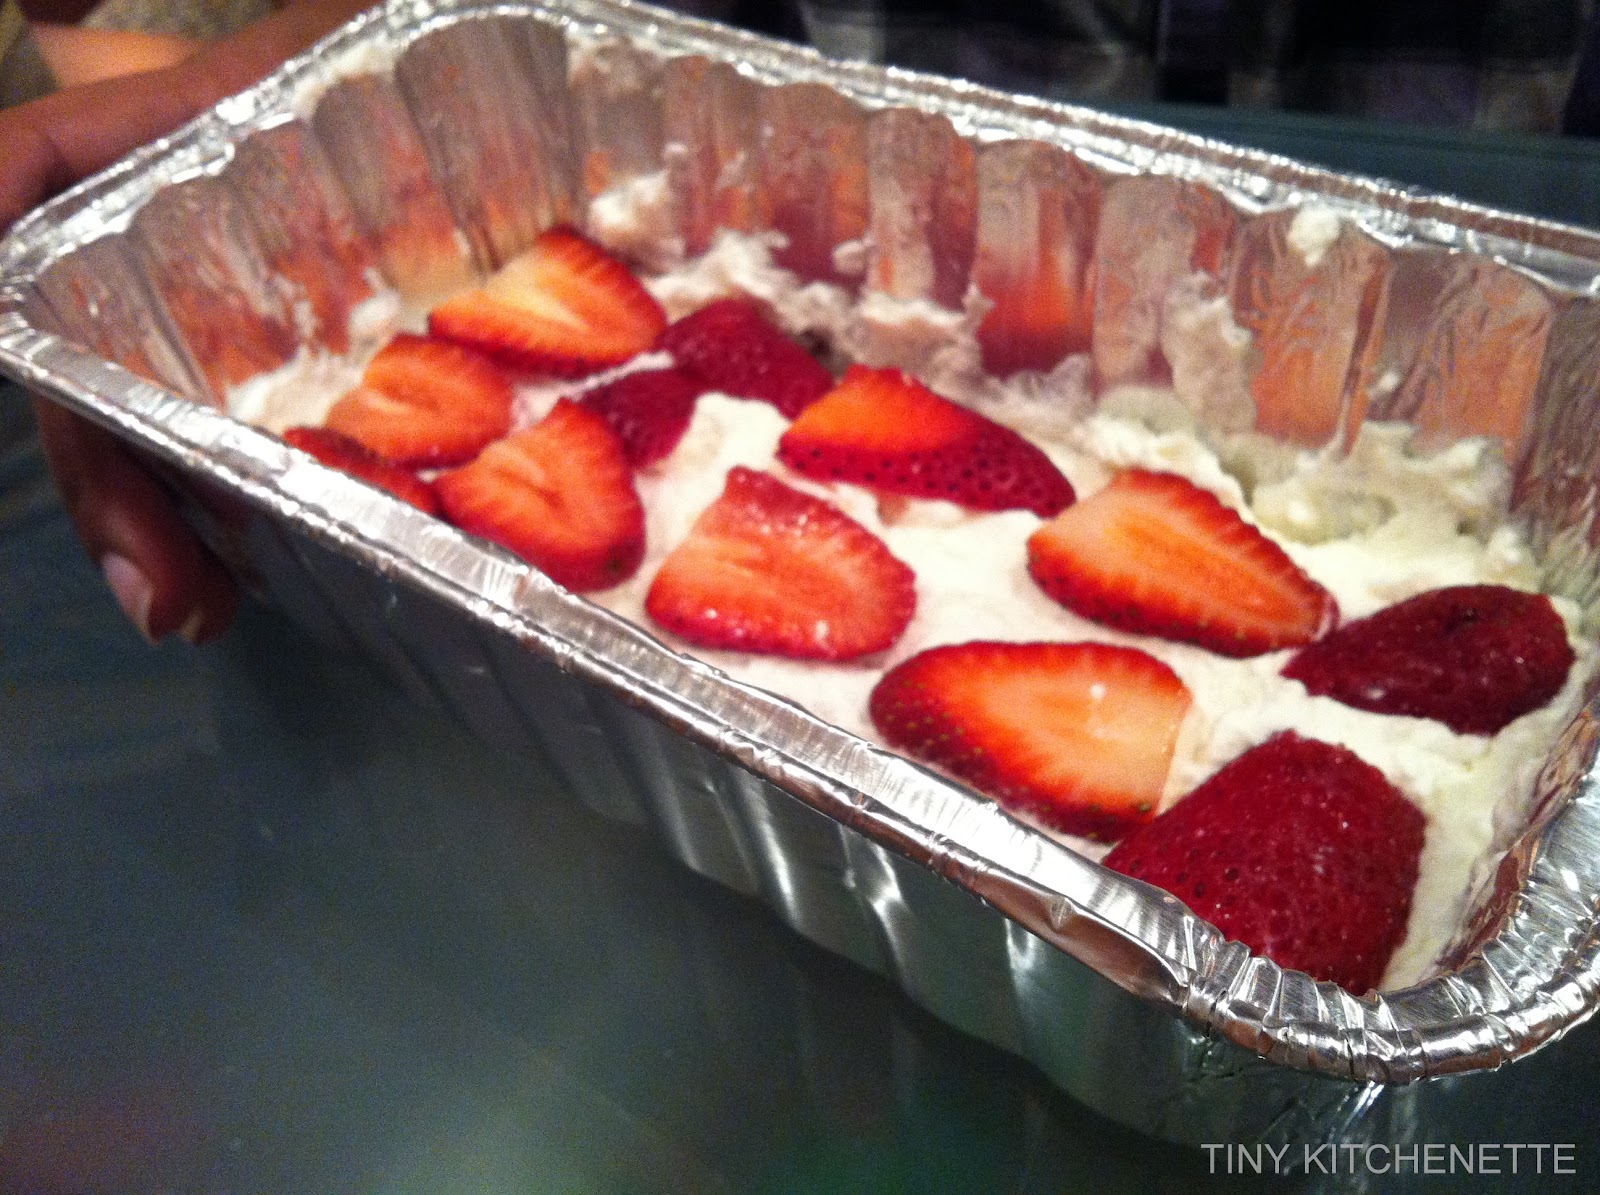
Ok now layer! Add a dollop of whipped cream to the bottom of the pan. Next completely cover the cream with graham crackers. Then pile on some more cream. 
Next layer some strawberries and then cover in yet more cream. Please don't think about the calories! There's so much cream. 

Repeat steps until you reach top of pan. As a final step (which isn't pictured) make the ganache. Heat cream until bubbling occurs along the edges. Pour over chocolate, let it sit and then whisk. Drizzle over the dessert. 

Refrigerate for at least 4 hours. Dish is best within 48 hours, otherwise it makes really soggy.  

Wednesday, May 4, 2011

Finals Suck, Have a Treat


Today, is Wednesday. Hump day. After today everything is smooth sailing,  right? Wrong, there is no easy coasting until Friday, because its FINALS WEEK! This is probably the most stressful time of the year for a college study. Long nights, early mornings, red puffy eyes and the occasional slice of pizza; all in the name of good grades.

I took my hardest final last night and I still have one more to go on Friday. Knowing how stressed I was feeling at this time, I decided to spread a little cheer. I made Rice Crispy Treat pops and passed them around. I hope I brightened someone's day. 

Dani  

Wednesday, April 27, 2011

This made me smile.....


...and for once my smile came from something not food related.


Sunday, April 24, 2011

Happy Easter!

Hey guys,

I just wanted to wish you all a Happy Easter!
May it be full of laughter, family, candy and egg hunts!

Dani

Saturday, April 16, 2011

Happy Birthday To Me!

My 21st birthday was Thursday, and I had a divine time. It was just an ordinary day. I had class. I had work. But what made it totally awesome was I got to take my ID picture and I went to Bravo's.

Bravo's. MMMM. I love Italian food. It speaks to me. I secretly think in another life I WAS Italian. I simply have to say the best thing to get there is the Chicken, Spinach, Bacon Flatbread. It's been two days and I'm still fantasizing about it. I don't like spinach, but this flatbread was delicious. It had the right balance of all the flavors and everything tasted fresh. I'm trying to think of a way to reproduce it so I can have it at my (future) wedding! Haha, seriously, it's a must try.

I wanted to bake and decorate my very own cake for my birthday, however there's been some difficulties with the kitchen. So I'll have to test my cake decorating skill at a later date. I do however bring you Jumbo Chocolate Chip Cookies!

Jumbo Chocolate Chip Cookies adapted from The Taste of Home Cookbook
1/2 cup butter, softened
1/2 cup sugar
1/2 cup packed brown sugar
1 egg
1 tsp vanilla extract
1 1/4 cup AP flour
1/2 tsp baking soda
1/2 tsp baking powder
1/2 tsp salt
3/4 cup flaked coconut
3/4 cup semisweet chocolate chips

Gather the above ingredients.

Cream both sugars and butter in a large bowl.

 Beat in vanilla and egg.

Mix flour, baking soda, baking powder, and salt.

Slowly add dry ingredients to creamed mixture.

Stir in coconut and chocolate chips.

On an ungreased baking sheet, shape dough into 3 tsp balls about 3 inches apart. Bake at 350 for about 12-18 minutes or until lightly brown. Cool on wire racks.

Makes about 1 dozen cookies.

*I forgot to take a picture of the end result and Judge ate them all!

Thursday, March 31, 2011

The Spice of Life


Snick-er-doo-dle. Snicker-doodle. No matter how you say it, to a person who has never had a snickerdoodle cookies, it just sound down right WEIRD. I admit, I never had a snickerdoodle cookie until last year. I was the one who cringed at the sound of a snickerdoodle cookie.

Why would anyone want to eat a SNICKERDOODLE cookie?

Because it's the favorite cookie of one of your loved ones.

...Oh, wait is that just me?

Ok, no really, you want to eat a snickerdoodle cookie because they're delicious. And what's more delicious than a cookie? A cupcake, of course!

Before you can start daydreaming of cupcakes. I'm sure you're wondering, what the heck is a snickerdoodle?

Snickerdoodle is simply a sugar cookie with a twist. Cinnamon gave the sugar cookie a whole new make over. Instead of frosting a sugar cookie, it is rolled in cinnamon sugar (cinnamon is also incorporated in the cookie dough)

So why such a weird name for a simple delight? No one knows for sure, although it is rumored to have German or Dutch origins. Where ever the name came from it sure is fun to say!

Snickerdoodle Cupcakes Recipe via Stephanie's Kitchen

Listed are the ingredients for cupcakes and the frosting. Cupcakes: 1 1/2 cake flour, 1/2 tbsp baking powder, 1/4 tsp salt, 1/2 tbsp cinnamon, 1/2 cup butter, room temp, 1 cup sugar, 2 eggs, 1 tsp vanilla, 2/3 cup milk. Frosting: 4 oz cream cheese, room temp; 4 tbsp butter, room temp; 1/4 cup milk; 4 1/2 cups confectioners' sugar, halved; 1 tsp vanilla; and 1/2 tsp cinnamon. Plus cinnamon sugar to sprinkle on top

In a large bowl mix together flour, cinnamon, salt and baking powder.

Then build upper arm strength by creaming the butter and sugar in another bowl. Shout out to everyone with a Kitchen Aid mixer who can do this much easier and faster than I can. Alas, at least it wasn't by hand this time!

Add the eggs and vanilla.

Now slowly incorporate flour and milk. Alternating between flour and milk.
Line a muffin pan with pretty pastels colors, in hopes that Spring will soon arrive.

Fill cupcake liners. Stick in oven and bake at 350 for 18-20 minutes. Frost with cream cream frosting.

Cinnamon Cream Cheese Frosting

Cream butter and cream cheese. Add half of the sugar, milk, vanilla and cinnamon., mix well. Add the rest of the sugar and beat until light and fluffy. Then decorate until your heart's content!

Thursday, March 24, 2011

Red Velvet Cheesecake Brownies


I don't know about anyone else, but I LOVE to snack while I study. Studying is such as tedious task, and snacks comfort me while I try to figure out how amines react with cyclohexanes. Ugh science!

Good news is that I'm finally catching up and I decided to share two of my loves with you. I adore all things red velvet, except the fabric it makes my teeth itch (yes, I repeat, it makes my teeth feel itchy). In fact, I plan to have a red velvet cake at my wedding.

However, red velvet cakes, cupcakes and brownies have to compete with my love of cheesecake. Thankfully, Nicole, from Baking Bites, made it so I didn't have to choose. Her recipe for Red Velvet Cheesecake Brownies were delicious.

Ingredients
Red Velvet Batter
1/2 cup butter
2 oz dark chocolate, chopped
1 cup sugar
2 large eggs
1tsp red food coloring
2/3 cup all purpose flour
1/4 tsp salt

Cream Cheese Mixture
8- oz cream cheese, room temperature
1/3 cup sugar
1 large egg
1/2 tsp vanilla extract


Preheat oven to 350F. Line and grease a 8 or 9-in baking pan. 
Melt the butter and chocolate in a small heatproof bowl. I used the double boiler method for fun since there's nice glass bowls in the kitchen. To use this method, add water to a pot big enough to support your bowl. Place the bowl onto of the pot and heat. Be sure to stir to ensure even melting. However, you can easily melt the chocolate in the microwave in increment of 10 secs.
Whisk the eggs, sugar, vanilla, and food coloring in a large bowl.
Add in chocolate and stir into smooth. At this point batter should be bright red. Feel free to add an addition 1/2 tsp of food coloring if the color isn't to your liking. 
Next stir in flour and salt until just incorporated. 
Pour the batter into baking pan. Spread into even layer.
Now on to the cheesecake part!
 Confession: Those are not my hands in the picture below. Too bad, because what fine hands they are. Huge and graceful at the same time. Ha. 

In a medium bowl, have someone beat cream cheese, sugar, egg, and vanilla until smooth. 
Now comes the fun part. Drop spoonfuls of the cream cheese mixture into the red velvet batter. Take a knife and swirl pretty patterns like so:
When you're done playing artist, bake for 35-40 minutes or until knife comes out clean when inserted. 
Cool completely before cutting and serving. Refrigerate in a seal-tight container. Enjoy chilled or room temperature. 
Makes 12 large brownies
*Warning: Brownies are very addictive. I ate them ALL in two days. :(

Monday, March 21, 2011

Best Chocolate Chip Cookie Challenge


Sorry I've been away guys (or mostly gals, but maybe I shouldn't assume) but I've been playing catch up with schoolwork. I have an exam next week and a group project to start. EEK!

Anywho, while on Spring Break (yes, it must be capitalized), I decided I wanted some chocolate chip cookies. So I pulled out a cookbook and grabbed a recipe. Chocolate chip cookies is a classic recipe. It should have been easy, right? Well, it wasn't. It was a complete disaster; and this isn't my first cookie disaster.

The first catastrophe occurred about a month ago. Instead of butter, I used margarine. Little did I know that it didn't have enough fat content. So, please learn from my mistakes. If you're going to use margarine make sure it has at least 65% vegetable oil, otherwise the cookies will spread too thin.

My most recent mistake involves my patience and inability to take my time. Yea, I know those are bad qualities to have in a baker but, hey, I'm working on it. Before I explain my mistake, I have a confession to make. I don't own a Kitchen Aid mixer. :GASP: It gets better, I don't even own a hand mixer. Shocking, right?

So here's the problem: Since I don't own a mixer and I'm short on patience, I end up adding too much flour at a time, thus I can't incorporate the ingredients properly. My dough turned out to be a dry crumbly mess. While I was on the verge of tears, my dad calmly told me to try again (he also said I owed him for the ingredients I wasted on the bad batch, pssh!)

So that's what I'm going to do! Keep going until I make the perfect chocolate chip cookie. Boy, it's going to be a lot of chocolate, but I'm prepared.

Feel free to send any of your favorite chocolate chip cookies recipes.

-Dani

Sunday, March 13, 2011

Family Time

Family is important. It is the glue that holds people together. Our families shape us whether good or bad and helps us determine who we will be. After enjoying a Sunday meal with my family, I found out a couple days later that my grandfather had passed. Although my grandfather and I weren't really close, it still leaves a hole in my heart. I remember when I was younger, I would sit on his shady porch eating popsicles. He had given me the nickname "Legs" because I had juicy thighs as a toddler. My mom was "Sticks" because she was so tiny. I never saw him much after my childhood years, he worked a lot. However, his memory will live on in the stories that my aunts and uncles tell about their childhoods.

Sunday dinners are what brings families together in between holidays and busy schedules. I'm glad I had an opportunity to cook for my family. I love them dearly.


Corned Beef and Cabbage
Cabbage adapted from Cooks.com
Corned beef - 2-3lbs is average (my mom went all out and got like a 8lbs one!), 1 cup of brown sugar
1 cup of mustard, head of cabbage, 1 medium onion, 3 stalks for carrots, 1/4 cups of butter, 1 1/2 cup water
2 tsp of Orange Pineapple juice and a can for sliced pineapples

The kind of corned beef I purchased was already pre-seasoned so, I didn't do anything extra since it was my first time cooking it. I opened the package in a large pot. 
Pour in enough water to cover the corned beef. Bring the water to a boil and then simmer for two hours (if you have an average sized corned beef 2-3 lbs.) The USDA states that for every pound you should cook for an hour.
While the corned beef is cooking peel the carrots and cut them diagonally. Chopped the onion. When the corned beef is close to being down, you can mix the glaze. Mix the mustard, the brown sugar and orange pineapple juice in a bowl. Transfer the corned beef to a shallow baking dish and cover the top of with the glaze and pineapple slices. Bake at 350 for 45 minutes. 

Saute the onion in butter in a large sauting pan. When onions are tender, add the water and bring to a boil. Once brought to a boil, add cabbage and cook for 45 minutes. Add carrots and cook carrots until tender. 
Slice diagonally across the grain and serve. 


I baked a box cake as well


*Just a little note: The corned beef wasn't has tender as I liked, so the next morning I put it in a slower cooker for about 4 hours. It came out super tender and juicy.*

Monday, March 7, 2011

Sunday Dinners

It's been a long time since I've had a Sunday Dinner. Not in a I don't eat on Sundays type of way, but in a meal created with love and enjoyed by family way. Since I've been away for college all of my Sundays are spent eating food in a cafe mostly full of people I don't know and prepared by people who could care less about me who are paid to do so.

So when my mom mentioned she wanted corned beef and cabbage, I knew this had to be a Sunday meal. After church, I got started right away cooking the 9 lbs (it was a big as a small baby!) corned beef and preparing the cabbage. It was a day long process but it was worth it. I got to prepare a meal with love for my family. We watched movies (Law Abiding Citizen is a must see!), enjoyed good food and there was dessert too.

There will be another post soon with details of my Sunday meal. Unfortunately, there aren't many photos since Judge decided to be a handy man instead of my photographer. He ended up helping my dad put together a rod for our drapes.

Does anybody else have memories of family Sunday dinners? I would love to here them.

Thursday, March 3, 2011

Truffles


For Valentines day I didn't get a box of chocolate, balloons, or roses. I spent my day in the dentist office. Sucks, right? The dentist chewed me out so bad that I didn't even want to look at a sweet. I couldn't stay away too long though. Who can?

So when Judge asked me what we were making this week, I immediately thought of  the creamy-chocolaty richness that is a truffle. I know a truffle sound like a delicacy that couldn't possibly be made by a college student, but it's actually quite simple. All you need is chocolate, heavy cream, more chocolate and if you're feeling risky a little liqueur. 

Recipe originally from Confections of a Foodie Bride

5 oz of dark chocolate (I used Baker's Unsweetened);
 1/4 cup heavy cream
pinch of salt,
 Cocoa powder or nuts (I decided to use nuts at the last minute)
Optional: 1 1/2 tsp Grand Marnier

Chop the chocolate into coarse pieces and set aside in small bowl. Heat cream, salt and liqueur (optional) until edges bubble. 
Pour the cream into the bowl of chocolate and let sit for a few minutes. 
Stir chocolate until smooth. If chunks remain, microwave for additional 10 secs (stirring in-between) until all is smoothly melted. Place bowl in the fridge for 45 minutes to an hour. Once cooled use a  portion scoop or a spoon to shape into tbsp sized balls. If chocolate is still soft place in freezer until firm. 

 Finally roll in cocoa powder or nuts. Enjoy right away or store in a airtight container in the fridge.